What is blogger Gadgets?

What is blogger Gadgets?

Posted in
No comments
By Unknown

Gadgets is very important part of your blog because you can make more attractive your blog , add images , generate revenue form adsense showing by showing adds on your blog  , add Social media Links & much more...
Here is steps to add gadgets into your blog
Login to your account and click on layout button
after clicking your on Add Gadget a new window will open as given below. Now Chose your desired gadgets from list

If you want add custom gadget for your blog click on HTML/Javascript widget . Now you have to Enter your gadget title and type your gadget given below field and save it


Comments Settings for Blogger Posts

Comments Settings for Blogger Posts

Posted in
No comments
By Unknown

Here is how you change your comment settings with Blogger. Click the images below to enlarge. To set controls over your comments click Posts and Comments under Settings on your Blogger Dashboard.

  • I recommend that you select Anyone or Registered User for Who can comment?
  • For Comment Moderation select Always. You can add your email address into the box I have highlighted and you will be alerted when there are new comments to approve.
  • PLEASE select No for Show word verification. 
  • You can even add in a message for your Comment Form Message.

Customize the Name of your Comments

You can change the word comments to something else if you want. Go to the layout on your blog and then click edit on the Blog Posts box. The window above will pop up and I have pointed out where you can change the name of comments.

How to Add Links in Your Comments

  • Go to the comment box in the blogger blog where you want to put your comment.
  • Write your comment.
  • Replace the words with the below code in which you want to insert your link
<a href="http://bloggingprofessor.blogspot.com">Blogging Professor</a> 


Permissions and Privacy Settings for Blogger

Permissions and Privacy Settings for Blogger

Posted in
No comments
By Unknown

Blogger has some default settings that you should consider changing immediately, for both privacy and control over your blog content.It's important to remember to click on the Save Settings button before you leave any Settings page, otherwise any new settings won't be saved and applied.
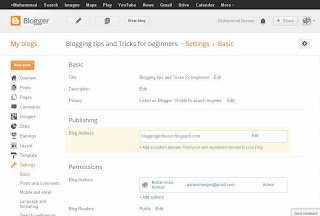
You can open the Settings page by following the “Settings” link on the left of the Dashboard, or by using the “Admin Options” arrow. On this page, you can change your blog title, description, and privacy settings, which controls whether your blog is on Google's listings or can be found by search engines. Use the “Edit” link next to any setting option to make changes to each setting.
  • You Can Edit Your Blogger Title
  • Add Blog Description
  • Change the Privacy settings of your blog to search engins
  • Publishing” is the setting used to change the blogspot.com subdomain URL, or assign your own domain name to your blog.” If you want to assign an existing domain or buy a domain name for your blog, you can do it here by clicking the “Add a Custom Domain Name” link.
  • Permissions” are also managed in the Basic settings. Changing permissions is important if you want to manage your blog's privacy. It's where you control adding additional authors to your blog and, more importantly, where you control who can read and see your blog.
  • To allow anybody to read your blog means the everyone on the World Wide Web, or in other words, anyone with access to the Internet can find and read your blog.
  • You can limit your blog readers to people you choose, which requires that you invite them by email. Selecting this option brings up a window to enter the email addresses of people you want to invite. Once these are entered, Blogger will send out an email invite, which will ask them to sign in with their Google ID or create one if they don't have. Only these people will be allowed to view your blog, and they will be asked to log in whenever they go to your blogger URL.
  • “Only Blog Authors” allows you to invite people, through a process like the one above, to write their own posts on your blog. Note that any reader who can view your blog will be able to comment on your posts, so this option is best for only very small or family blogs.


How can Share blogger Post to Social Media sites

How can Share blogger Post to Social Media sites

Posted in
No comments
By Unknown

This is also all about SEO, because the social media is playing great role to generate traffic, if you have sufficient fans on your social media page you can drive them to visit your blog by post your blogger posts directly to your pages, as you have seen every blogger are connected with their social media pages may you find widget of social media on their blog.
So, this post also regarding Social Media Sites. We will learn how can we Automatically publish Blog Post to Facebook, Twitter, Google+ and Other Social Media Websites.dlvr.it : Site which Distribute Your Blog with Facebook, Twitter, Google+ and other social media Websites.
Go to dlvr.it and sign up for new account

How to Creat Pages in Blogger

How to Creat Pages in Blogger

Posted in
No comments
By Unknown

Blogger Static Pages are a good way for bloggers to create specific pages such as contact information or an About Me , Contact page, Privacy Policy etc section. on stand-alone pages that are linked from your blog. 
Two major differences in Post  and Pages : 
The static pages basically are the same as post pages, but there are several things that make them different.
  1. One of the differences is that static pages don't appear in the home page.
  2. These don't have a label, and are not indexed as archive pages.
For Create a New Page
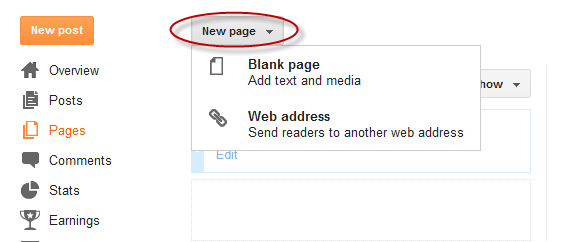
  • Log in to your Blogger & Click on Pages.
  • Click on New Page Then select Blank Page.
  • Type your page title and write the page's contents.When you have finished the editing, click on Publish button.
Now set alignment for your pages.:

  • Keep it as nav menu below header - Top tabs

  • Display the page in your blog's sidebar - Side Links

  • Add the page's link manually to your template - Don't Show
  • After you have chosen where the page will appear, click on the Save arrangement button And now you're done!.Now you have owned the static page. If you want another static page, just repeat the steps above.