Free Websites To Download Blogger Templates

Posted in
No comments
By Unknown

1. MasTemplates.com

This website is having one of the treasures of blogger templates and the important thing is that the webmaster himself creates new templates and publishes for free of cost. You’ll find a lot of templates there for any topic you may have for your blog. Even there are templates for creating an Online Store which was never possible before. Video sharing blog templates are also available and you can find any template you need for any kind of blog.

2. Templateism.com

This website for free blogger templates was created by Syed Faizal Ali one of the talented young bloggers in Pakistan. The blog is offering awesome and unique blogger templates for absolutely free. You’ll find some stylish and even amazing blogger templates by browsing this website. All the templates are awesome in design and professional in coding. Must give it a try.

3. Bestbloggertemplates.net

I like this website for blogger templates because it has everything that you need to find a beautiful template for your blog. You may search by selecting a category, you may search by selecting a color, you may search a template by selecting a Layout. There are every option available for you to find your desired blogger template. This website is created by Paul Crow from Ireland and he has another blog spiceyourblog.com for blogger widgets and tutorials.

4. Deluxetemplates.net

Deluxetemplates is one of the older sites offering free blogger templates as well as WordPress themes. If you want to find a template that is converted from WordPress to Blogger then you must browse this website to find a stunning template for your beloved blog. All you need to do is; just go there and view the templates one by one.

5. Btemplates.com

This is also one of the older websites which offer free blogger templates for last couple of years. If you want to have thousands of blogger templates for free then there is no better site than btemplates.com itself. It will provide you a large number of tools to search your template which you require for your blog. All templates are free to download and even there are instructions to install any template before downloading.

6. Btemplates4u.com

This website is also without doubts a great source to find best blogger templates. I’ve visited it many times and I observed they are updating this website on regular bases. This website is not only offering free blogger templates but also offers free WordPress themes which makes your job more easier for both the platforms at once. So you must give it a try to find your lovely template over there.

0 comments:

How to track your blog traffic?

Posted in
No comments
By Unknown

Blogger is a worthy choice for getting your business blog out there for free. Keeping track of your blog's traffic tells you how many people view your blog and where they're finding it. Blogger offers tools to track your page views and other blog statistics, like the number of views within a given time period and where your audience resides geographically. Blogger's statistics let you track the blog's hits as a whole or by how many views each blog entry has.
  • Log in to Blogger and click the name of the blog you'd like to track. Click "More stats" next to Pageviews or click "Stats" in Blogger's navigation menu on the left of the screen. Both options lead to the same Stats page.

  • Click "All time" near the top of the page to view the blog's stats dating back to its creation. Alternately, click "Now," "Day," "Week" or "Month" to view stats for the appropriate time frame.
  • Look at the "Pageview" stats to the right of the graph for a precise number of page views for today, yesterday, last month and all time.
  • Click the "Posts" subcategory under Stats in the navigation bar. This page shows the page views for each blog entry based on the time frame you have selected.

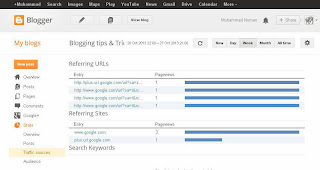
  • Click the "Traffic Sources" subcategory in the Stats menu to view where your readers find your blog. The Referring URLs and Referring Sites sections show which websites people used to connect to your blog. For example, if you share your blog on Facebook and six people click the link, Facebook will show up as a referring site with "6" next to it. The Search Keywords section shows which keywords people searched for that lead them to your blog.

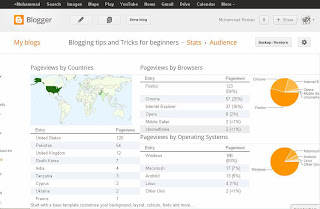
  • Click "Audience" under the Stats menu to view demographics regarding your readers. Demographics include which countries your readers reside in as well as which Web browser and operating system they used to view your blog.

0 comments:

What are backlinks and how do I use them?

Posted in
No comments
By Unknown

Backlinks are links from one site directed towards another website, so for example on a a personal blog: John puts a link to his Golfing club’s website, that will count as a backlink for the golfing club.
There are two types of backlinks
  1. Internal Link
  2. External Link

Internal Link

An internal link is a link from one webpage on your site to another page on your site. So, it’s an internal link. For example, if I do this – best web hosting- that’s an internal link to another page on my website.Internal linking is a great way to boost links to important pages on your site and it helps visitors navigate your site too.

External Link

An external link is just the opposite of an internal link. It’s a link to a page outside of your own website.So, if I link to Google, that’s an external link. If someone clicks on that link, they leave my website.You can’t control who links to your site, but you can control who you link to. If you link to spammy, scammy websites, it could have an effect on your own rankings. It’s a factor that Google takes into consideration.Backlinks are extremely useful in Search Engine Optimisation as towards search engines they essentially count as a recommendation from other websites which improves your site’s relationship towards – especially Google but it also has an effect on Bing and other such search engines.Thus websites with more sites linking in (backlinks) will get higher credit for related searches by users with search engines than websites with less backlinks.

0 comments:

How to Customise your blog Template

Posted in
No comments
By Unknown

Many people want to design a awsome blog but they don't know how to design . I am going to tell you all how you can setup a good looking blog , Just follow these steps.

  • Login to your Blogger account 
  • Click on layout button (A)

  • Click on Backup/restore button (B)
  • Point (A) for backup of your existing Template
  • Point (B) for choose a New template 
  • Recomonded that save your existing trmplate before adding any new template
  • After changing don't forget to save your settings


Another methode to chnage our old Blogger template to new blogger template is :


  • Click on Layout buttuon
  • Click "Edit HTML" ,
  • Copy Your Existing Template before to any word file
  • Replace all old coding with a new coding.
  • Save your template before exit.
Happy Blogging


0 comments:

How to apply Adsense on your blog?

Posted in
No comments
By Unknown

Google AdSense is an advertising network that that places there sponsored ads to those who have own their websites or blogs. Websites or blog owner can earn money  by displaying text or image advertisements in certain locations of your website or blog.
Now I'm going to tell you that how you can join Google adsense program . I will guid you to step by step Google adsense signup process , follow the process for good results . If you don't read all Terms & Conditions Of Google Adsense , Before starting must read carefully.

If you have a Gmail account Click " Yes Proceed to Google Acount sign in " & If You have not then click on " No, Creat a new Google Account "
Sign in to your Google Account & Press " Yes Proceed to Google Acount sign in " When You click  , The screen will be shown as given below

  • When you sign in , result will be shown as

(a) In first box enter your website URL's in Same formate as given in Example
example.com
www.example.com
(b) Selet yor Language
(c) Check Box Of "Terms & Conditions"
(d) Click To Continue
(a) Enter Your Contry Name
(B) Enter Your Full Name ( Muhammad Numan ) . Be carefull your check will be issue on name whic you given in this field . write 100% Corect spell as writen in your bank Acount
There is no difference in the services or payment structure between Individual or Business accounts. Business account payments will be made payable to the Company Name, while Individual accounts are paid out to the Payee Name of the account holder.
Rapida and Western Union Quick Cash payment options are only available to publishers with individual-type accounts .
Once your application has been submitted, you can't change your account type.
(c) Street Adress must be in this format (including house number, street name/number, flat/apartment number)
(d) Enter Your City Name(Enter You Phone Number as ( Your Contry Code + Your Number without zero )
(e From a Friend
(f) Submit My Application
Once you submitted your application, you will receive an email from Google Adsense within 6 to 8 hours that will tell you whether you have passed the first step or not. If you have passed the first check, then you can log in to your Google Adsense account. You will see a red bar across the top of your account. To initiate the second step of the review, you need to implement the ad code on a page of your signup URL that receives traffic. If you do not implement the ad code, the review process will not continue.
Once our system detects that the code has been placed on a live page, we will automatically review your websites with the ad code - not only the page that you submitted in the application. It typically takes 2-3 days for our specialists to complete the review.As soon as we’ve reviewed your application, we’ll send you an email with details on your application status. If you implemented the ad code and it takes longer, make sure your code is implemented correctly and is placed on a page that receives impressions. Don’t place the code on a test page that has nothing but the ad code on it.
Once your application is fully approved, the ads automatically start showing in your AdSense for Content ad units and the red alert in your Google Adsense account disappears.


0 comments:

What is blogger Gadgets?

Posted in
No comments
By Unknown

Gadgets is very important part of your blog because you can make more attractive your blog , add images , generate revenue form adsense showing by showing adds on your blog  , add Social media Links & much more...
Here is steps to add gadgets into your blog
Login to your account and click on layout button
after clicking your on Add Gadget a new window will open as given below. Now Chose your desired gadgets from list

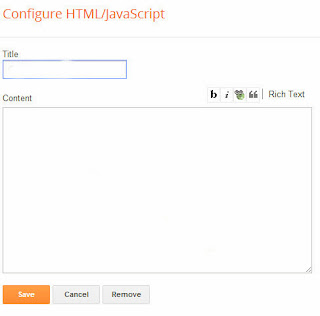
If you want add custom gadget for your blog click on HTML/Javascript widget . Now you have to Enter your gadget title and type your gadget given below field and save it


0 comments:

Comments Settings for Blogger Posts

Posted in
No comments
By Unknown

Here is how you change your comment settings with Blogger. Click the images below to enlarge. To set controls over your comments click Posts and Comments under Settings on your Blogger Dashboard.

  • I recommend that you select Anyone or Registered User for Who can comment?
  • For Comment Moderation select Always. You can add your email address into the box I have highlighted and you will be alerted when there are new comments to approve.
  • PLEASE select No for Show word verification. 
  • You can even add in a message for your Comment Form Message.

Customize the Name of your Comments

You can change the word comments to something else if you want. Go to the layout on your blog and then click edit on the Blog Posts box. The window above will pop up and I have pointed out where you can change the name of comments.

How to Add Links in Your Comments

  • Go to the comment box in the blogger blog where you want to put your comment.
  • Write your comment.
  • Replace the words with the below code in which you want to insert your link
<a href="http://bloggingprofessor.blogspot.com">Blogging Professor</a> 


0 comments:

Permissions and Privacy Settings for Blogger

Posted in
No comments
By Unknown

Blogger has some default settings that you should consider changing immediately, for both privacy and control over your blog content.It's important to remember to click on the Save Settings button before you leave any Settings page, otherwise any new settings won't be saved and applied.
You can open the Settings page by following the “Settings” link on the left of the Dashboard, or by using the “Admin Options” arrow. On this page, you can change your blog title, description, and privacy settings, which controls whether your blog is on Google's listings or can be found by search engines. Use the “Edit” link next to any setting option to make changes to each setting.
  • You Can Edit Your Blogger Title
  • Add Blog Description
  • Change the Privacy settings of your blog to search engins
  • Publishing” is the setting used to change the blogspot.com subdomain URL, or assign your own domain name to your blog.” If you want to assign an existing domain or buy a domain name for your blog, you can do it here by clicking the “Add a Custom Domain Name” link.
  • Permissions” are also managed in the Basic settings. Changing permissions is important if you want to manage your blog's privacy. It's where you control adding additional authors to your blog and, more importantly, where you control who can read and see your blog.
  • To allow anybody to read your blog means the everyone on the World Wide Web, or in other words, anyone with access to the Internet can find and read your blog.
  • You can limit your blog readers to people you choose, which requires that you invite them by email. Selecting this option brings up a window to enter the email addresses of people you want to invite. Once these are entered, Blogger will send out an email invite, which will ask them to sign in with their Google ID or create one if they don't have. Only these people will be allowed to view your blog, and they will be asked to log in whenever they go to your blogger URL.
  • “Only Blog Authors” allows you to invite people, through a process like the one above, to write their own posts on your blog. Note that any reader who can view your blog will be able to comment on your posts, so this option is best for only very small or family blogs.


0 comments:

How can Share blogger Post to Social Media sites

Posted in
No comments
By Unknown

This is also all about SEO, because the social media is playing great role to generate traffic, if you have sufficient fans on your social media page you can drive them to visit your blog by post your blogger posts directly to your pages, as you have seen every blogger are connected with their social media pages may you find widget of social media on their blog.
So, this post also regarding Social Media Sites. We will learn how can we Automatically publish Blog Post to Facebook, Twitter, Google+ and Other Social Media Websites.dlvr.it : Site which Distribute Your Blog with Facebook, Twitter, Google+ and other social media Websites.
Go to dlvr.it and sign up for new account

0 comments:

How to Creat Pages in Blogger

Posted in
No comments
By Unknown

Blogger Static Pages are a good way for bloggers to create specific pages such as contact information or an About Me , Contact page, Privacy Policy etc section. on stand-alone pages that are linked from your blog. 
Two major differences in Post  and Pages
The static pages basically are the same as post pages, but there are several things that make them different.
  1. One of the differences is that static pages don't appear in the home page.
  2. These don't have a label, and are not indexed as archive pages.
For Create a New Page
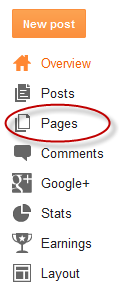
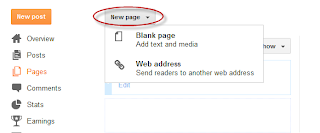
  • Log in to your Blogger & Click on Pages.
  • Click on New Page Then select Blank Page.
  • Type your page title and write the page's contents.When you have finished the editing, click on Publish button.
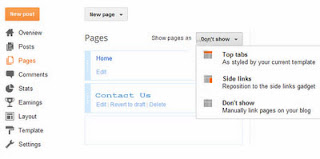
Now set alignment for your pages.:

  • Keep it as nav menu below header - Top tabs

  • Display the page in your blog's sidebar - Side Links

  • Add the page's link manually to your template - Don't Show
  • After you have chosen where the page will appear, click on the Save arrangement button And now you're done!.Now you have owned the static page. If you want another static page, just repeat the steps above.

    0 comments:

    How to Enable Search Description For Blog Post In Blogger

    Posted in
    No comments
    By Unknown

    Search Description in blogger post is very important element to improve SEO ranking. So, be careful to enter search description while posting on your blog. How can you see blogger post Search engine see picture given below.
    A : Its our Post 
    B : Its Our URL 
    C : Its our search description


    Always keep in mind that our Title of the post is very first element is Post title, second Domain name and our Post URL , third is search description which appears in search result.You can say it plays significant role in bringing traffic to your blog.You can state in search description about contents in the post and can use some important keywords. Another importance of search description is when you are doing social bookmarking to increase valuable back links for your site, there most of the social bookmarking sites ask you for description which you can easily provide. Use the same description which you have written for the post.
    How to enable Search Description for blog
    By default, search description option disable in blogger. Therefore need to enable it while starting any new blog. For enable search description check these settings step by step.
    • First of Log in to your Blogger Account
    • Click on your desired blog which you want to enable SEO settings
    (1)


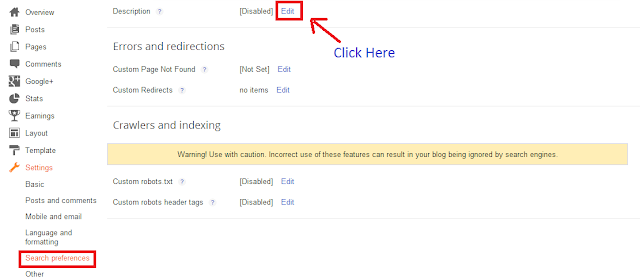
    •  Now Go to Setting and Click on Search Preferences.

    (2)
    • By the default "no" is selected , Select "Yes" & enter your blog Description in "Search Description Box" after entering Your  desired Description press save changes button.
    (3)
    • Once you have enabled the option, you are able to use it in every post. Use related keywords to the post. Keywords which you have been used in title should also be provided in search description. Do not publish any post without search description.Some Bloggers do not use search description in every post and say that only blog description which is given once, is enough. It is completely wrong concept. For better On-Page SEO of your site, you need to provide search description for every individual post like Post title, Permalink and content. If you have published, you can easily maintain that post after. We recommend you to make a short but clear search description.
    (4)
    Tips to Enter SEO friendly description

    • Do not repeat keywords.
    • Do not write in words form like “blogger, blogger tips, blogger widgets, etc.” Write in sentence form like “Find Blogger Widgets, Templates, tips and tricks and many more stuff to enhance your blogging career.”
    • Never forget to use the main keyword.
    • Do not exceed from 155 letters.
    • Try to have minimum 140 to 150 letters or you may use 100 – 150 letters.
    • Write in natural way. Do not cheat by writing unrelated keywords.
    All the above points have been kept in mind while writing SEO description .By following these tips, you will see that your blog will bring a massive traffic. Better description could bring you better traffic. So give good time to making SEO based description.


    0 comments:

    How to Show Location on Blogger Posts

    Posted in
    No comments
    By Unknown

    While location services are gaining more and more coverage and users, it’s easy to overlook similar features for bloggers. For Blogger users, geo-tagging articles is available as a feature of Blogger in Draft. If you use it as your default dashboard, you have probably noticed the ‘Location’ box below the post editor, next to ‘Labels’. Once you search and add a location, the data is added to the blog post and the RSS feed after publishing.
    Of course, adding a location doesn’t always make sense or adds relevant information for the reader. But if you run a photo-blog, for example, location can add valuable context to the photos you are sharing and talking about. The information could be used by search engines to correctly rank the blog posts when doing a local search. I’m not sure if that is the case now, but I don’t think there is a technical reason why this couldn’t be implemented.
    The article location can also be displayed for the visitors on the web site. With a fresh, unaltered template it’s only a matter of activating a check box: in the Blogger in Draft dashboard, go toDesign  Page Elements, click Edit on the Blog Posts widget and activate the check box like in the screen shot on the right. Here you can set up where the new box will appear in the blog post and the caption – by default “Location: ”. After saving, the blog should display a new element on those blog posts where you specified a location during compose.
    If that’s not the case, there is always the manual fix: a piece of code to be added to the template. On the same Design tab, visit Edit HTML – preferably after you back-up the template, check Expand Widget Templates and add the code below:
    span class='post-location'>
    <b:if cond='data:top.showLocation'> <b:if cond='data:post.location'>
      <data:postLocationLabel/> <a expr:href='data:post.location.mapsUrl' target='_blank'><data:post.location.name/></a> </b:if> </b:if> </span
    Where you add the code depends on where you want the location element to display. To show it in the footer for example, paste the lines after <div class='post-footer-line post-footer-line-1'>. I added it in line right after the post time stamp; in this case, look for <div class='post-header-line-1'> and add the location code after the two closing <span> tags for author and time stamp.
    It’s a bit odd that this feature, launched more than a year and half ago, still wasn’t added to the regular Blogger Dashboard for all users, while other features took a couple of months to graduate. My guess is the Blogger team is waiting for a more wide-spread support of geo-location in browsers; instead of manually choosing the location, the browser could detect and suggest it to the user, making geo-tagging easier and faster

    0 comments:

    Right Way to Optimize Permalinks in Blogger

    Posted in
    No comments
    By Unknown

    Now we are going to discus another feature that enables you to more effectively customise your search preferences, permalinks.
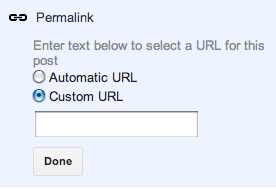
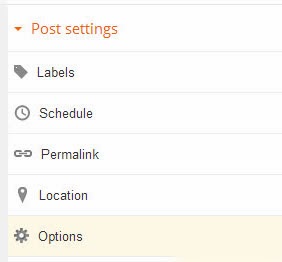
    When you write a post, Blogger automatically generates a permalink for you which based on the title of the postCustom permalinks give you more control of your blog and posts. These new custom links also provide readers with more information about your post when scanning search results.If you prefer to use a custom permalink, you can do so via the “Permalink” option in the Post Settings box as shown in image (B). 
    A
    B
    To create your own URL for a specific post, simply select Post title “Right Way to Optimise Permalinks in Blogger”,  The auto generating url of blogger is
    "http://bloggingprofessor.blogspot.com/2013/10/right-way-to-optimize-permalinks-in.html"
    and now you want to customize the url simply click on "Custum URL" & enter your new desired URL in the field. Suppose I write "Permalinksin custom URL field then my customized URL is
     "http://bloggingprofessor.blogspot.com/2013/10/permalinks.html". 
    The bolted & red coloured area is the portion of the URL that is customisable.As I am writing this post in OCT 2013 therefore it shows "2013/10" in my URL. If the custom permalink you entered already exists, Blogger will attempt find a free one for you.
    At present, the characters allowed in a custom URL are limited to: a-z, A-Z, 0-1. The only special characters available are underscore, dash, and period.


    0 comments:

    How to Create Labels in Blogger Posts?

    Posted in
    No comments
    By Unknown

    Labels are an easy way to categorise or tag blog posts. When writing or editing blog posts, you can add labels easily by clicking the Labels section in the right-hand column. .When you click on labels its looks like image given below
    Labels are an easy way to categorise or tag blog posts. When writing or editing blog posts, you can add labels easily by clicking the Labels section in the right-hand column. .When you click on labels its looks like image given below.You can also add a Label Gadget to your blog in the Layout section of your site (see  
    Gadgets and the Blogger Layout). When choosing to add a Label Gadget, select whether you would like it to display Labels in a list, or as a “Tag Cloud” in which commonly used labels appear more prominently than those less used.

    0 comments:

    How To Schedule Your Post In Blogger To Publish Automatically?

    Posted in
    No comments
    By Unknown


    Blogger is a very popular and and favourite blogging platform which deals with lot of latest bloging features but most of user not aware from latest blogging features of blogger.And scheduling a post is another feature which seems to be pretty much hidden from all of the blogger users. If you'd like your post to automatically publish at a specific date and time, you can schedule your posts on the Post Editor. Under "Post Settings" on the right-hand side, just click on Schedule.

    When you can get clicked on Schedule than it will expand as given below.If you select Set date and time, you can choose a date and time on a calendar for your post to be automatically published.

    Now Go and Click the publish button .Don't worry -- your post will only publish at the date and time that you've determined in the settings. We are just scheduling it. After you click the publish button all the work is done. Now you will be able to see a tag attached to your post which means you have schedule your post for automatic publishing.

    0 comments:

    Upload Video to Blogger Post

    Posted in
    No comments
    By Unknown


    You can add video content to your blog posts by clicking on insert video option:
    When You get clicked on insert video option this type of window will be open to you as given below

    Upload a video from your hard drive
    Search You Tube for a video to embed
    Insert a video from those you have uploaded to You Tube
    Add a video from your mobile phone
    Record a video using your web cam
    Remember Always
    • You can upload of 100mb max size of video to blogger post for checking the size of desired uploading file right click on file and select properties & if you are a Mac user then  right click on the file and Click “File Info.If your selected file is over than 100mb than use video compressor software to make small size.
    Video settings for Uploading Video to Blogger
    • COMPRESSION: H.264
    • QUALITY: 50% 
    • FRAME SIZE 640x480 (4:3)
    Videos which are available to embed in your post will appear in the main section to  the right. If you upload a video, the code required to embed the video in your post will be  automatically added so you don't need to tinker with the post's HTML. Select the video you would like to add. The video thumbnail will enlarge enabling you to  preview it in a small player before inserting into your post.


    0 comments:

    Upload Images to Blogger Post

    Posted in
    No comments
    By Unknown


    There are many ways of choosing images to include in your blog posts:
    • Upload an image from your hard drive
    • Insert an image previously uploaded to this blog 
    • Add an image hosted in Picasa Web Albums 
    • Upload from your mobile phone
    • Use your web cam
    • Paste the URL of an image hosted elsewhere
    To add an image, click the insertimage button in the posting toolbar and select the method you
    would like to use. When You get clicked on insert video option this type of window will be open to you as given below

    For added images to your blog upload and select images  and click the “Add Selected” button. By default, the images you paste into your posts will be “medium” sized and will be aligned to the centre of the page .If you want to change the alignment, size or other image options, click on the image in the text editor to see a menu of available options: When you upload images to your blog, these will be automatically added to an album on Picasa which is named using the title of your blog. If you ever want to reuse a previously uploaded image, you can select “From this blog” in the image menu.

    0 comments:

    Understand New Post Layout of Blogger

    Posted in
    No comments
    By Unknown


    Its a main screen of New Post of bloggers blog . in this post we will discus all about its layout


    1-
       : This is undo & redo buttons 

    2-
     
    • Use  for font style
    • Its used for text small and large.
    • Its Used for Heading , Subheading , Minor Heading & Normal Text style.
    • Use bold, italic, underlined or strike-through text using the buttons above the form
    • Use different coloured fonts and background colours using the drop-down buttons
    3-
       By Using "Link" you can insert link on your selected text.  
    4-
     For Insert Pictures & Videos
    5-
         For Insert a Jump Break in Paragraph.
    6-

     Text Alignment Insert a numerical (ordered) or bullet (unordered) list 
    7-
    Select an area of text to appear as a quote using the block quote button 
    8-
     By using this feature all formatting of text remove.9- Its used for to check spells in our Post

    0 comments: